Maximus program allows high school program administrators and coaches to input certified and non-certified combine-type data directly into student-athletes profiles for cegeps and universities to review as part of their recruiting activities.
To get started, simply:
1. Contact us to open your free account (Free for limited time)
2. Review the Maximus Combine Certification Guidelines
3. Conduct the combine testing as per the guidelines
4. Enter the data in the student-athletes’ profiles
5. Complete the Maximus Certification Form
6. Await a confirmation from us that the certifiable data you submitted is now 100% certified
Thank you,
The Nexus Sports Team
The Nexus Sports Team
Nexus Sports Maximus Certification Program
Nexus Sports program takes aim at assisting organizations like yours in ensuring combine-type events are conducted in a safe, secure and standardized manner for all high school student-athletes.
Taking Measurements
Each prospect has measurements of height, weight, arm length, and wingspan. The arm-length or reach is used to calculate the vertical jump net gain. All these metrics are to be added or updated by the student-athlete in their profiles as they are part of the banner.
Here are some videos that can help you with your measurement process.
Filming the various sequences is not mandatory but should your organization choose to do so, the student-athletes can load them up in their Nexus Sports profiles under "Combine" if they first upload those videos in a private profile on YouTube first.
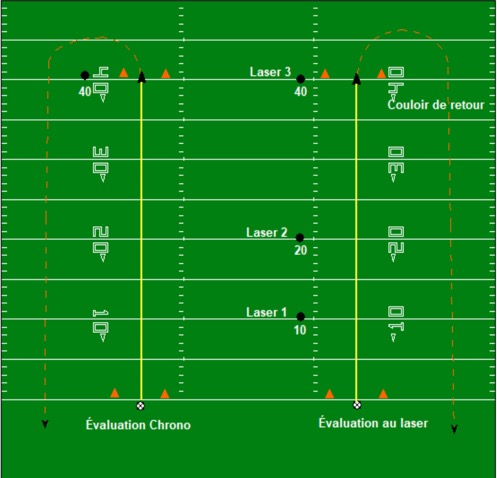
This is a test of speed and power. From a three-point stance, a player runs 40 yards as fast as he can. Split times are recorded at 10 and 20 yards to measure acceleration. The 10-yard time is especially important for offensive and defensive linesmen because they usually do not run further than that during a play.
1. Player starts in a 3-point stance.
2. After player hears, “You can go” from Director, he must hold for a 2-count before running.
3. No rolling starts. No quick starts.
4. Timer will start watch when player’s down-hand separates from the surface.
5. Player will run the 40-yard dash twice.
6. The first 40 attempt will be videotaped.
7. All players will be timed at the 20-yard mark. Linemen will also be timed at the 10-yard mark.
8. After running the 40-yard dash, players return to player holding area near starting line.
9. On return route players jog BEHIND the camera down the middle of the field.
10. There will be an estimated 10–15-minute wait until the 2nd 40-yard dash attempt.
Certified Methodology: Laser timed on turf
Non-certified Methodology: Stopwatch-time or on trac
*Source: https://www.nflregionalcombines.com/Docs/testsanddrills.pdf
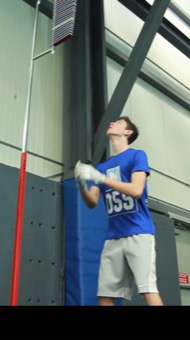
A test of explosion and power. The player jumps off both feet straight up as high as he can. The vertical jump is most important for receivers and defensive backs.
1. The Director will measure 18 and/or 24 inches down from the bottom marker on the Vertec and place a piece of tape at each mark.
2. Player will stand w/ his right side (ankle, hip, shoulder; left side if left-handed) against the Vertec and extend his arm upward as far as possible. (steps 1 and 2 are to calculate the reach if not done so as part of the “Taking Measurement” segment).
3. Director will extend the Vertec to the top of the players’ extended hand at the top edge of tape and tighten in place. The bottom marker will represent 18 or 24 inches for that player.
4. Player starts jump with both feet planted on the ground.
5. Player may swing arms and dip knees.
6. Players may not shuffle feet before take-off as this will result in a scratch and jump will not count.
7. Player attempts 2 jumps touching the highest slat-marker on the Vertec from the floor.
8. That mark represents the players’ vertical jump.
9. To calculate the Vertical Jump, you must subtract the Reach (in inches) from the vertical leap itself (also in inches). This will yield the true leap measurement. Select the true measure from the dropdown, rounded up.
Certified Methodology: Vertec device
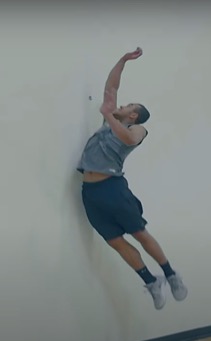
Non-certified Methodology: Tape to wall or vertical jump mat
*Source: https://www.nflregionalcombines.com/Docs/testsanddrills.pdf
1. The Director will measure 18 and/or 24 inches down from the bottom marker on the Vertec and place a piece of tape at each mark.
2. Player will stand w/ his right side (ankle, hip, shoulder; left side if left-handed) against the Vertec and extend his arm upward as far as possible. (steps 1 and 2 are to calculate the reach if not done so as part of the “Taking Measurement” segment).
3. Director will extend the Vertec to the top of the players’ extended hand at the top edge of tape and tighten in place. The bottom marker will represent 18 or 24 inches for that player.
4. Player starts jump with both feet planted on the ground.
5. Player may swing arms and dip knees.
6. Players may not shuffle feet before take-off as this will result in a scratch and jump will not count.
7. Player attempts 2 jumps touching the highest slat-marker on the Vertec from the floor.
8. That mark represents the players’ vertical jump.
9. To calculate the Vertical Jump, you must subtract the Reach (in inches) from the vertical leap itself (also in inches). This will yield the true leap measurement. Select the true measure from the dropdown, rounded up.
Certified Methodology: Vertec device
Non-certified Methodology: Tape to wall or vertical jump mat
*Source: https://www.nflregionalcombines.com/Docs/testsanddrills.pdf
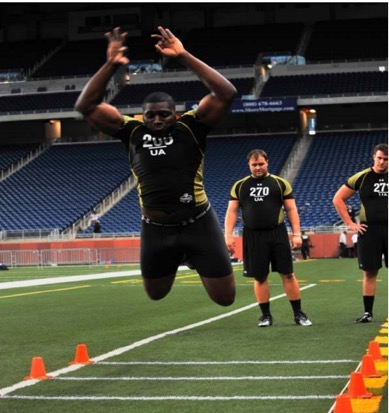
Like the vertical jump, this is a test of lower body strength, explosion, and power. The broad jump measures how far you can jump, not how high. From a standing position, the player jumps forward off two feet as far as he can. The broad jump is the most important for running backs, linemen, and linebackers.
1. Each player receives two attempts at the Standing Broad Jump.
2. Players must start with both feet/toes totally behind start line for valid jump.
3. Players may swing arms and bend knees prior to jumping.
4. Upon landing, player must maintain control, landing balanced with both feet planted.
5. Upon landing player may also fall forward, but not backwards.
6. Jumps are measured from heel of the foot nearest to the initial jump line.
7. Jumps are measured to the nearest whole inch.
8. Results are recorded in feet and inches jumped.
Certified Methodology: As described above
Non-certified Methodology: Any version that drifts away from the certified version
*Source: https://www.nflregionalcombines.com/Docs/testsanddrills.pdf
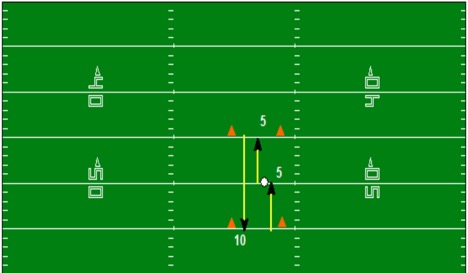
Also called the 5-10-5 Shuttle, this is a test of agility including speed, explosion and changing of directions. Technique is also important. Each player will be timed how fast they can go 5 yards laterally, then 10 back in the opposite direction, and finishing 5 yards back to the start line.
1. While facing the Drill Director, player starts in a 3-point stance with legs straddling the line equally.
2. Player must have hand squarely on the start line and hold the position for 2 seconds.
3. After player hears, “You can go” from Director he may start drill.
4. Player will run to the right line 5 yards away and touch the line with right hand. Player will then sprint 10 yards to the left and touch the line with left hand.
5. After the last line touch, player will sprint through the finish line, which is the starting point of the drill.
6. All players will complete one run to the right and one run to the left. (2 attempts)
7. Down hand is same as running direction. Left hand to the Left – Right hand to the Right.
8. It is the responsibility of the player not to slip and adjust to the surface.
Certified Methodology: As described above
Non-certified Methodology: Any version that drifts away from the certified version
*Source: https://www.nflregionalcombines.com/Docs/testsanddrills.pdf
Also called the L-Test, this test is all about assessing a player's ability to change directions quickly, bend and accelerate. Defensive backs and pass-rushers are good players to keep an eye on.
1. While standing next to cone A, player starts in a 3-point stance with down hand behind the start line.
2. After player hears, “You can go” from Director he may start drill.
3. Player will run straight for 5 yards and touch the line with right hand. Player will then sprint back (5) yards towards the starting line and touch the line with left hand
4. After that line touch, player will sprint back towards cone B (again), pivot 90° around cone B sprinting towards cone C
5. Player will take an inside track to pivot 180° around cone C and make his way back to cone B, pivot 90° around it and sprint back towards the starting line at cone A.
6. All players will complete one run to the right and one run to the left. (2 attempts). Best time is kept.
7. Downing the hand is permitted to help pivot the cones.
8. It is the responsibility of the player not to slip and adjust to the surface.
Certified Methodology: As described above
Non-certified Methodology: Any version that drifts away from the certified version

*Source: https://www.nflregionalcombines.com/Docs/testsanddrills.pdf
1. While standing next to cone A, player starts in a 3-point stance with down hand behind the start line.
2. After player hears, “You can go” from Director he may start drill.
3. Player will run straight for 5 yards and touch the line with right hand. Player will then sprint back (5) yards towards the starting line and touch the line with left hand
4. After that line touch, player will sprint back towards cone B (again), pivot 90° around cone B sprinting towards cone C
5. Player will take an inside track to pivot 180° around cone C and make his way back to cone B, pivot 90° around it and sprint back towards the starting line at cone A.
6. All players will complete one run to the right and one run to the left. (2 attempts). Best time is kept.
7. Downing the hand is permitted to help pivot the cones.
8. It is the responsibility of the player not to slip and adjust to the surface.
Certified Methodology: As described above
Non-certified Methodology: Any version that drifts away from the certified version
*Source: https://www.nflregionalcombines.com/Docs/testsanddrills.pdf
This test is for a more mature group of individuals seeking recruitment at university level. The bench tests upper-body strength by seeing how many times players can put up 225 pounds.
1. Player lies down on the bench and placing his hands on the barbell at shoulder width
2. After player hears, “You can go” from Director he may start drill.
3. Player begins lowering the bar and pressing it back up.
4. The bar must touch the chest
5. the elbows must straighten completely at the top, and the hips may not rise up during the upward press motion.
6. Once a player can no longer fully extend it’s elbows with the weight, a spotter will assist in returning the barbell back into place.
7. Any rep requiring assistance or does not result in full extension of the elbow is not to be counted as a rep.
8. It is the responsibility of the player to conduct this exercise in a safe manner and understand his or her limitations
Certified Methodology: As described above
Non-certified Methodology: Any version that drifts away from the certified version